Wednesday 14 January 2009

grails: Inline Editing For Collection Elements

Consider the scenario, where a User is viewing data on a page and then realises that a change needs to be made to a particular field. Usually this would require navigating to an 'edit' page, modifying the field and then resubmitting the form before viewing the original page to confirm the changes.

Javascript offers a better alternative, an approach called Inline Editing whereby the User can dynamically edit & validate a field, update the server in the process without the need to perform form submission and page refreshes.

In this post I'll demonstrate how to implement this feature using the Scriptaculous library. The example is based upon a simplified issue tracker as shown below.
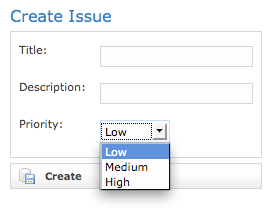


This is the create.gsp page, which allows the User to create a new Issue and assign it a priority which can assume a value of either Low, Medium, or High.

The following image shows list.gsp, where we display a typical 'list' view of the issues collected.


Now it would be useful if the User could adjust the priorities for the various issues without having to perform the typical edit/submit/refresh cycle just to alter a single field. By implementing Inline Editing for the priority field we would enhance User productivity and application usability in one fell swoop.

So let's follow through the steps to implement this feature.

Step 1: Import scriptaculous

<g:javascript library="scriptaculous"/>


Step 2: Code up the Ajax

In list.gsp locate the line as follows, which simply outputs the priority for a given issue

<td>${fieldValue(bean:issue, field:'priority')}</td>


and replace it with

<td>
    <span id="${issue.id}" class="editInPlace">${fieldValue(bean:issue, field:'priority')}</span>

<script type="text/javascript">
new Ajax.InPlaceCollectionEditor("${issue.id}",
"/inlineApp/issue/updatePriority",
{ collection: [['Low','Low'], ['Medium','Medium'], ['High','High']], ajaxOptions: {method: 'post'} })
</script>

</td>


The replacement snippet consists of wrapping a <span> element around our original statement and inserting some javascript code. The <span> element is assigned an id equal to the identifier of our Issue object and a styling class of 'editInPlace' which is defined in step 4.

Below the <span> element we insert some javascript code that invokes the Ajax.InPlaceCollectionEditor function defined in Scriptaculous. This function is specifically for creating editable fields for collection types and it works in the following way. Firstly it binds a listener to an HTML element (e.g. <span> )to detect for mouse clicks. In this event, it will replace the element with a drop down list populated with a collection of values, e.g. Low, Medium and High. Once the User has made a selection, the new value is transmitted to a grails action via an Ajax call. The action will update the relevant Issue object on the server with the new value. Finally the function will update the page by replacing the drop down list with the newly updated value.

The function takes a number of arguments, the first of which specifies the id for the element that needs to be editable. In our case this is the <span> element. Note that this argument serves as the id of the editable element as well as the identifier for the Issue object that needs to be updated on the server. The second argument is the URL pointing to the grails action that will update the relevant Issue object on the server with the new priority value selected by the User. Thirdly we define a collection of items to be displayed in the drop down list when the User clicks on the editable field. These simply match the options available on the create.gsp page, when a User creates an Issue. Lastly we specify the HTML transport method.

Step 3: Implement the grails action


def updatePriority = {

if(params.editorId)
{
Issue issue = Issue.get(params.editorId)

issue.priority = params.value

issue.save()
}

render params.value

}


This is quite a simple action. It takes the id for the selected Issue, retrieves its corresponding object and then resets its priority value. The updated Issue object is then persisted. Finally the action returns the newly updated value to be displayed on the page. In principle this action can validate any new data provided by the User, but in this example there is no requirement to do so since the User is restricted to a list of options.

Step 4: Apply styling via css

The final step is to apply css styling,

span.editInPlace {
color: blue;
background:#efefef;
border-bottom: 1px solid black
}


The page list.gsp now looks like this


Note that the styling on the priority fields allows the User to discern which fields can be edited inline or not. Now when the User clicks on a priority value, e.g. for the first record, this field is replaced by a drop down list from which the User can select a new value, as shown below


The drop down list is accompanied by two buttons, one for submitting the change, and the other to cancel the operation. The image below shows the result when the User has selected a priority of 'High' before clicking on the 'ok' button. This has updated the corresponding Issue object on the server and the value on the page.


Unfortunately this not the end of the story. The images shown above were viewed under FireFox. Attempting to do the same thing with IE6 results in a viewing problem, where the Priority field is not visible once it's been clicked on. This defect is attributed to a bug within earlier versions of the scriptaculous library but has been rectified for the most recent versions of the api. However the versions of the javascript libraries bundled with grails are not the most recent and are still susceptible to this defect. If I recall correctly, even grails 1.1 still employs version 1.8.0 for scriptaculous and 1.6.0 for prototype. This raises an interesting question as to when these libraries will be updated for the grails distribution.

In the meantime, there are two possible solutions to this problem. The most obvious is to manually upgrade the javascript libraries supplied with grails to the most recent versions. However it's not readily apparent what implications this would have in terms of incompatibilities, since some grails code such as the Ajax tags depend on these libraries. It may be the case that such an approach would have no significant impact, but it is difficult to adopt this solution without further investigation.

Alternatively and this is the approach I've taken, is to apply the fix documented here. The solution requires us to replace this line in control.js [line 761]

var list = document.createElement('select');

with this

list=new Element('select');

Redeploying the app and viewing it under IE6 shows that the problem has indeed disappeared.

On a final note, we could tidy up the code by abstracting the javascript code into a custom grails tag in a similar fashion to the inline editing example given by Graeme Rocher in the first edition of his excellent book.

Thursday 18 December 2008

grails + ajax: chained selects

From time to time, I run into the following problem. A User has to fill in a form containing 2 drop down lists, and I need to populate the second one with options that depend on the selection made on the first select box. This problem, commonly known as 'Chained Selects' can be easily solved using a dusting of ajax magic.

The principle behind the solution is reasonably straightforward and involves attaching a listener to an HTML element such as a select field. This listener detects events triggered when a User moves the mouse, clicks on an element, etc. In our case, we're interested in the event when the User makes a selection. The listener will then fire a javascript function to perform an ajax call to the server. This call will inform the server as to the selection made on the first select element. Based on this information, the Server will create an HTML snippet containing the second select element and populate it with the correct set of options. This snippet is then sent back as a response to the ajax function, which updates the page accordingly.

To demonstrate this feature, I'm using a simple example containing 2 domain classes, Family and Member. These are listed below,


class Family{

String surname

String description

static hasMany = [members : Member]

static constraints = {
surname(blank:false)
description(blank:false)
members(nullable:true)
}


String toString()
{
return surname
}

}


and,


class Member{
 
String firstName

String lastName

String username

static belongsTo = Family

Family family

static constraints = {
firstName(blank:false)
lastName(blank:false)
username(blank:false)
family(nullable:true)
}

String toString()
{
return lastName + ", " + firstName
}
}


The example revolves around 2 drop down lists. The first of these lists families, e.g. Simpsons and Griffins [Family Guy]. Now I want the second drop down list to be correctly populated with the family members depending on the selection made to the first drop down list.

Step 1: Import 'prototype'

We're going to use prototype to implement this feature. Note you're not restricted to using this library. Others such as jQuery will do an equally impressive job. So the first step is to import in the library as follows,

<g:javascript library="prototype"/>


Step 2: Implement 2 drop down lists

Next we need to implement the 2 select elements as so,

<td>
<label for="family">Family:</label>
</td>
<td>          
<g:select id="familySelect" from="${Family.list().surname}" name="familySelected" value="">
</g:select>
</td>

<td valign="top" class="name">
<label for="member">Member:</label>
</td>


<td>
<div id="memberSelect">
<g:select from="${Member.list()}" name="memberSelected" value="">
</g:select>
</div>
</td>


Step 3: Hook up the ajax code

<g:javascript>
document.observe('dom:loaded', function() {
$("familySelect").observe("change", respondToSelect);
});


function respondToSelect(event)
{
new Ajax.Updater("memberSelect",
"/chainedSelect/family/updateSelect",
{method:'get', parameters: {selectedValue : $F("familySelect")} }
);
}

</g:javascript>


Here we do a couple of things; first of all we attach a listener to the 'familySelect' element to detect for any 'change' events fired when a User makes a selection on this element. Secondly we implement the ajax function that will be triggered when such an event is detected. In this instance we're using prototype's Ajax.Updater() function, which takes a number of arguments that are fully documented elsewhere. The first argument is the id of the element that will be updated by the response to the ajax function. In our case this will be a second drop down list. The second argument is a url pointing to a grails action to service our ajax request. Finally we have a set of optional parameters, the important one being 'selectedValue' which will hold the selection made by the User on the first drop down list.

Step 4: Write the grails action


def updateSelect = {
     def familySelected = Family.find("from Family as family where family.surname=:surname", [surname:params.selectedValue])

render (template:"selectMember", model : ['familySelected' : familySelected])

}


This the grails action that will service the ajax call. Quite simple really. It takes the value selected from the Family dropdown list and uses it to retrieve the corresponding Domain object. This object is then supplied to a tempate file that is subsequently returned as a response to the ajax function in step 3.

Step 5: Write the HTML to update the page.

<g:select
      from="${familySelected.members}"
name="memberSelected" value="">
</g:select>


This is the HTML that will be used to update the page by the ajax function defined above. Note that since I'm using templates, I need to save this in a file whose name should be prefixed with an underscore, '_'.


And here is the final result.
When we select 'Simpsons' as the Family, the second drop down is correctly populated with the members of the Simpson family.


Conversely, if we select 'Griffin' as the family, the second drop down list is populated with the members of the Griffin family.

As a final note, this example could be improved by displaying a default set of values for both selects, when the page is first loaded.

You can download the code [chainSelectFamily.zip] from here.

Monday 15 December 2008

grails: Implementing Search [2]

In a previous post, I described a quick start approach to using the Searchable Plugin. This approach relied on the controller and view supplied with the plugin and is useful for prototyping and testing. However it's not the ideal way to implement search using the plugin.

In this post, I demonstrate how you can customise the Searchable plugin by developing your own controller and views.

The Searchable plugin provides us with 2 distinct ways to search the properties of domain classes. The first of these is the dynamic 'search' method

DomainClass.search(String query)


which is attached to Domain classes that have the static property 'Searchable' defined within them. This restricts the search to only the properties of the Domain Class.

Secondly the plugin provides the SearchableService class,

searchableService.search(String query)


which enables us to search properties across a set of Domain classes. The documentation here provides further details for both approaches.

Step 1-3: Setup

Repeat Steps 1,2 & 3 from the previous post.

I'm using a different example for this post to better demonstrate the similarities and differences between the 2 search mechanisms. This example consists of 2 domain classes listed below and whose purpose is self-explanatory,


class Film{
    String actor

String title

String releaseDate

static Searchable = true

static constraints = {
actor()
title()
releaseDate()
}

}


and,


class Music{
    String artist

String title

String releaseDate


static Searchable = true

static constraints = {
artist()
title()
releaseDate()
}


}


I've implemented step 3 slightly differently. Instead of 1 text-field, we now have the following,

<g:form url='[controller: "customSearch", action: "searchMusic"]' id="searchMusic" name="searchMusic" method="get">
<g:textField name="query" value="${params.query}" size="10"/> <input type="submit" value="Search Music" />
</g:form>

<g:form url='[controller: "customSearch", action: "searchFilm"]' id="searchFilm" name="searchFilm" method="get">
<g:textField name="query" value="${params.query}" size="10"/> <input type="submit" value="Search Film" />
</g:form>


<g:form url='[controller: "customSearch", action: "searchAll"]' id="searchAll" name="searchAll" method="get">
<g:textField name="query" value="${params.query}" size="10"/> <input type="submit" value="Search All" />
</g:form>


Which look like,


These text-fields, allow the User to search individually for Music or Film or indeed collectively across both categories.

Step 4: Implement the Controller

Next, we build our custom search controller, containing actions that will service the text-fields defined in the forms above.


import org.compass.core.engine.SearchEngineQueryParseException

class CustomSearchController{

def searchableService

def searchMusic = {

if(params.query?.trim())
{

def searchResults = Music.search(params.query)

def total = searchResults.total

def list = searchResults.results

return [totalResults: total, list:list, type:"music"]
}
else
{
return [:]
}

}


def searchFilm = {

if(params.query?.trim())
{

def searchResults = Film.search(params.query)

def total = searchResults.total

def list = searchResults.results

return [totalResults:total, list:list, type:"film"]
}
else
{
return [:]
}

}


def searchAll = {

if(!params.max) params.max = 5
if(!params.offset) params.offset = 0

if(params.query?.trim())
{
try
{

def searchResult = searchableService.search(params.query, params)

def total = searchResult.total

def list = searchResult.results

return [totalResults:total, list:list, type:"all"]
}
catch (SearchEngineQueryParseException ex)
{
return [parseException: true]
}
}
else
{
return [:]
}

}

}


At the top of the code, we inject in the plugins' SearchService class. Next we declare the actions required to service the search textfields defined in step 3. The first 2 actions implement search using the dynamic method, whereas the 'searchAll' action uses the SearchableService class mechanism. Both approaches return a 'searchResult' object which contains a number of results data documented here. For our purposes, we're only interested in the search results and their count.

I'm not going to list the view pages here as they're typical gsp pages and don't add any value to the current discussion. However if you're interested, the full code is available [compass2.zip] for download here.

The following images show the results from performing individual and collective searches.

This one shows a 'Music' only search, when I enter a value of 'Will Smith' into the 'search Music' textfield.


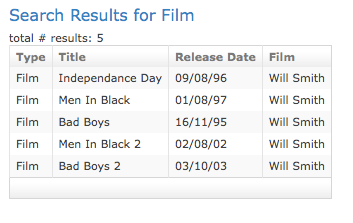
This one shows a 'Film' only search, when I enter a value of 'Will Smith' into the 'search Film' textfield.


And finally a collective search, where I enter the value 'Will Smith' into the 'searchAll' text-field.


As expected the plugin returns Music and Films associated with the artist/actor, Will Smith.

The complete code for this example [compass2.zip] is available here.

ps - I noticed something peculiar with Searchable plugin, when using the test data that I generate in the bootstrap class. If I perform a query on 'Will', it returns nothing. Yet if I enter a value of 'Will Smith', then the search returns the correct results. However if I repeat this for 'Mark' and 'Mark Wahlberg', I get identical results, i.e. I get back, Music/Film or both depending on the search type.

Friday 12 December 2008

grails: ajax powered validation [Update]

In a previous post, I outlined a method to perform textfield validation using jQuery. However a recent comment by Jan correctly pointed out a simpler method using grails' own ajax tag, <g:remoteField>.

So to implement this feature in a simpler way do the following,

Step 1: Import scriptaculous

<g:javascript library="scriptaculous"/>


Step 2: Code up the textfield and message div


<g:remoteField controller="member" action="validateUsername" paramName="username" name="username"

update="messageDiv" value="${fieldValue(bean:member,field:'username')}">

</g:remoteField>
<div id="messageDiv" style="color:blue"></div>


The message div will be populated with the ajax response, i.e. the uniqueness validation result.

Step 3: Code up the grails action


def validateUsername = {
        def message = ""

def inUse = ["homer", "marge", "bart", "maggie", "lisa"]

if (params.username)
{
if(inUse.contains(params.username))
{
message = "The username has already been taken. Please enter a different one"
}
else
{
message = "Username Ok !...."
}
}

render message

}


Not much change here other than the response messages.

And that's it.

Thursday 11 December 2008

grails: ajax powered validation

[The contents of this post have been superseded by this post]

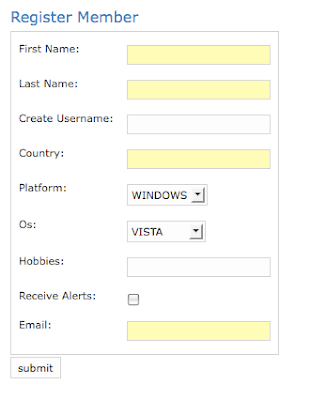
I'm not keen on filling in forms, especially ones which are badly designed. To give you an idea of what I'm talking about, consider the typical registration form as shown.

Here the User is expected to provide many personal details in addition to a username which must be unique. The catch is that the user won't know whether the value they have entered is unique until the form has been submitted.

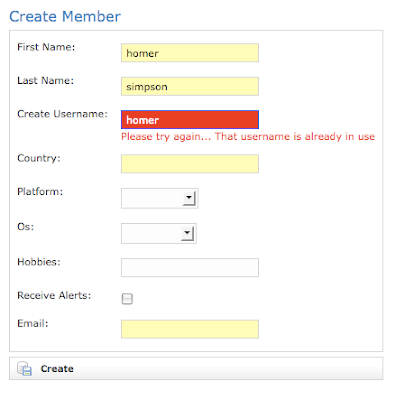
If the username is already in use, the form is redisplayed and the User is asked to provide an alternative.

Now one could envisage situations where the User
has many attempts at providing a valid username until they are successful. This would result in a number of redundant form submissions, page refreshes and clearly a frustrating experience for the User.

One way to address this shortcoming, is to use ajax to perform a validation check. Specifically, once a User has entered a value into the textfield, an ajax call is made to the server requesting that the textfield content be validated. The server performs the check and returns a response which will be used to generate a message informing the User about the validity of the data they have just entered. This approach overcomes the need to perform pointless form submissions and page regeneration.

To demonstrate how to implement this, I've developed a contrived example using jQuery's excellent support for ajax functionality.

Step 1: Download & Import jQuery

In this step you need to download jQuery and place it in the web-app/js folder.
Next you need to import it into the gsp page by placing the following statement between the <head> tags, e.g.

<g:javascript library="jquery-1.2.6.min"/>


Step 2: Setup the Textfield for validation.

Next we need to set up the textfield for validation. In this example I'm going to validate usernames.

<tr class="prop">
     <td valign="top" class="name">
<label for="username">Create Username:</label>
</td>

<td valign="top" class="value ${hasErrors(bean:member,field:'username','errors')}">
<input type="text" id="username" name="username" value="${fieldValue(bean:member,field:'username')}"/>
<div id="usernameMessageOk" style="color:green">Username Ok !....</div>
<div id="usernameMessageFail" style="color:red">Please try again... That username is already in use</div>
</td>

</tr>


Nothing difficult here. The only modifications I've made to the code generated by scaffolding is to add 2 extra divs which will be used to inform the User about the success/failure of the validation. Note these divs are hidden by default as shown in the next section.

Step 3: Hook up the ajax call

In this step we set up jQuery's ajax function to perform the validation


<g:javascript>
    var $j = jQuery.noConflict();

$j(document).ready( function()
{
$j('#usernameMessageOk').hide()
$j("#usernameMessageFail").hide()

$j("#username").change(function()
{
var name=this.value

$j.ajax({
url: "/ajax_validation/member/validateUsername",
dataType: "text",
data: "username=" + this.value,
cache: false,
success:function(text)
{
if(text == 'ok')
{
$j('#usernameMessageOk').show();
$j("#usernameMessageFail").hide()
$j("#username").css({'background-color': 'yellow', 'color':'black' });
}
else
{
$j("#usernameMessageFail").show();
$j('#usernameMessageOk').hide()
$j("#username").css({'background-color': 'red', 'color':'white' , 'border':'solid 1px #0000ff'});
}
}

});

});

});
</g:javascript>


There's quite a few things going on in this snippet. Firstly we hide the message div's using jQuery. Next we bind the username text-field to jQuery's .ajax() function. This will fire whenever the User moves focus away from the textfield e.g. by clicking elsewhere or hitting the 'tab' key.

The ajax function makes a call to a grails action, 'validateUsername' which determines whether the username is in use or not. The Server's response will be used to determine which of the messages contained within the hidden div's are displayed.

Step 4: Code up the grails action to validate the Text-field

In this step we implement the grails action which will receive the text-field content and validate it accordingly. For the purposes of this example I have used a simple list. You can easily replace this with code to inspect the database using GORM.


def validateUsername = {
       def message = "fail"

def inUse = ["homer", "marge", "bart", "maggie", "lisa"]

if (params.username)
{
if(inUse.contains(params.username))
{
message = "fail"
}
else
{
message = "ok"
}
}

render message

}


Quite simple really. The action will perform the uniqueness validation and return the result to the client.

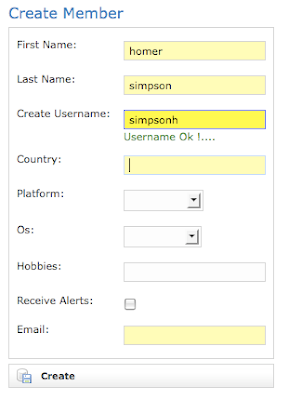
The two possible outcomes are shown below,


and,


That's almost it. One problem remains and that is if the User decides to hit the submit button when the username field has an invalid entry. To solve this simply alter your 'save' action as follows,


def save = {
            def member = new Member(params)

def inUse = ["homer", "marge", "bart", "maggie", "lisa"]

//check that username is still available

if(inUse.contains(member.username))
{
member.errors.rejectValue('username', 'member.username.validator.invalid')
render(view:'create',model:[member:member])
}


if(!member.hasErrors() && member.save())
{
flash.message = "Member ${member.id} created"
redirect(action:show,id:member.id)
}
else
{
render(view:'create',model:[member:member])
}
}


where 'member.username.validator.invalid' is a custom error message defined in the message.properties file. The code above will perform another validity check and ensure that in the case of failure, the User is redirected to the form and our custom error is displayed.

Finally this code could be improved by providing suggestions of usernames to the User.

Friday 5 December 2008

grails: Implementing Search

The ability for a User to perform searches for entries in the database is a critical requirement for most web apps. Implementing such a feature from scratch can be a rather daunting task. Thankfully there are open source solutions that alleviate the need to build your own search engine. Two of these, Lucene and Compass are bundled into a grails plug-in, enabling you to provide a powerful and flexible search capability for your Users.

Implementing search using this plugin is actually quite simple, as I will demonstrate in this post.

Step 1: Download & Install Searchable plugin

The first step is to download and install the Searchable plugin. Navigate to your project folder and issue the following command from a console window.

grails install-plugin searchable


Please note this assumes you are using JDK1.5+. If however, you're still using JDK1.4, then invoke the above command ensuring that the term 'searchable' is replaced with 'searchable14'.

Step 2: Modify Domain class

Open up your Domain class and add the statement 'static searchable = true '. In the example below, my domain class is called Issue and is a simplification of an actual class that I'm developing for a pet project. This flag enables the plugin to identify which records are available for search.

class Issue{

String title
String description
String status
String priority

static searchable = true

static constraints = {
title()
description()
status(inList : ["UNASSIGNED", "ASSIGNED", "CLOSED"])
priority(inList: ["TRIVIAL", "MINOR", "MAJOR", "CRITICAL", "BLOCKER"])
}

String toString(){
return title
}
}


Step 3: Create Search Textfield.

The next step is to provide a search box into which the User can enter search parameters. I do this by creating a search textfield like the one below,


<g:form url='[controller: "searchable", action: "index"]' id="searchableForm" name="searchableForm" method="get">
      <g:textField name="q" value="${params.q}" size="15"/> <input type="submit" value="Search" />

</g:form>


The textfield is embedded within a form that will pass its contents to an 'index' action on the plugins 'search' controller, either when the User clicks on the 'search' button or hits the 'enter' key.

To show what this would look like, I've knocked up a simple web app using the Issue class above. We now have something that looks like this

You can clearly see the search box at the top of the navigation bar. I've used the bootstrap class to create some test data which are shown in the table. This data will enable me to demonstrate that the search capability works and returns the expected results.

Entering a value of "CLOSED" into the search box returns the following response,

Although the plugin has successfully returned the expected results, the presentation of the data leaves a lot to be desired. Our application no longer looks consistent. Every time a User performs a search they'll end up with a page that clearly doesn't look right and they'll have to click on the browser back button to navigate somewhere else. The next step should fix this.

Step 4: Edit View for Search Results

Create a new folder 'searchable' under grails-app/views.

In this folder we want to place a copy of the view used by the plugin to display the results. The copy will subsequently be modified to generate a view that is consistent with our web application. So copy the file web-app/plugins/searchable-0.5.1/grails-app/views/searchable/index.gsp into the newly created folder. Here /web-app/ is the name of your project and searchable-0.5.1 refers to the version of the plugin that is in use. For my case, this happens to be 0.5.1. Check the version that you have downloaded and adjust accordingly.

Next we modify index.gsp in the following way,
  1. Delete all the css styling defined within the <head> tags
  2. Place the following meta-tag between the <head> tags
<meta name="layout" content="main"/>


Following these two steps should be sufficient to generate a results view that is consistent with your application. However for my application, I had to perform an extra step and rename the id's for the <header> and <main> divs. This was to prevent a conflict with css styling from my own style sheet.

The end result now looks like


This completes the tutorial, which I hope you will find useful. My intention was to enable you to get started quickly and in that respect the post has not and could not cover the full power of this fantastic plugin. That may be a task for another day.

The example code demonstrated here is available for download [compass.zip] from here. Please note that this is missing the plugin. I had to delete that in order to comply with the File Upload limit. However this shouldn't be a problem if you follow the installation instructions given above.

Tuesday 2 December 2008

grails: Templates


Previously I've used Tiles to provide a common look and feel to web applications.

Template frameworks like Tiles achieve this effect by enabling developers to define page fragments which are then assembled into a complete page at run time. This approach is quite appealing since the fragments are by nature reusable view components, thereby enhancing maintainability and reducing development time.

Grails uses 'SiteMesh' to perform this function, and does so in a simple and flexible way. No XML configuration here !!!

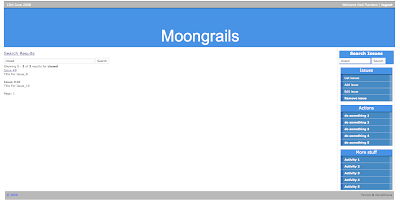
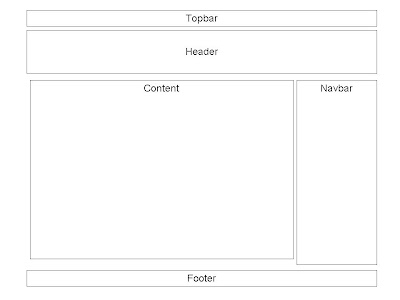
A typical page layout is displayed in the figure on the left. This is made up from the following view components. The topbar will display time/date and a welcome message identifying the user, and potentially a 'logout' button. The header will showcase the name of the application, and the navbar will contain a menu for navigation. The central panel will contain the content to be displayed to the user. Finally the footer will hold information such as Terms & Conditions, a Copyright notice etc.

To implement the layout shown here execute the following steps,

Step 1: start
You need a project, ideally populated with at least a single domain class with it's associated controllers and views. The picture below shows the default layout generated by grails.


Step 2: create re-usable templates
With the exception of the header and content fragments, we start by creating the templates for the remaining view elements. Create a folder called 'common' under the views/ folder. In this folder create the following files
  • _topbar.gsp
  • _navbar.gsp
  • _footer.gsp
Note that these files should start with an underscore, '_' and should not contain any HTML tags such as <head>, <body>.

Step 3: populate _topbar.gsp

<div id="welcome">
12th June 2008
</div>

<div id="menu">
Welcome Ned Flanders | <a href="#">logout</a>
</div>


Step 4: populate _navbar.gsp

<div class='navbarBox'>

<div class="navcontainer1">
<h1 class="panelHeader">
Users
</h1>
<ul class="navlist">
<li>
<g:link controller="user" action="list">
List Users
</g:link>
</li>
<li>
<g:link controller="user" action="create">
Add User
</g:link>
</li>
<li>
<g:link controller="user" action="edit">
Edit User
</g:link>
</li>
<li style="color:grey"><a href="#">Remove User</a></li>
</ul>
</div>

</div>

<div class="navbarBox">

<div class="navcontainer1">
<h1 class="panelHeader">
Actions
</h1>
<ul class="navlist">
<li><a href="#">do something 1</a></li>
<li><a href="#">do something 2</a></li>
<li><a href="#">do something 3</a></li>
<li><a href="#">do something 4</a></li>
<li><a href="#">do something 5</a></li>
</ul>
</div>

</div>

<div class='navbarBox'>

<div class="navcontainer1">
<h1 class="panelHeader">
Leisure
</h1>
<ul class="navlist">
<li><a href="#">Activity 1</a></li>
<li><a href="#">Activity 2</a></li>
<li><a href="#">Activity 3</a></li>
<li><a href="#">Activity 4</a></li>
<li><a href="#">Activity 5</a></li>
</ul>
</div>

</div>


Step 5: populate _footer.gsp

<span class="copyright"> © 2008</span>
<span class="tandc"> <a href="#">Terms & Conditions </a></span>


Step 6: modify main.gsp

Once the reusable view components have been defined, we include them into the layout. Open the file /views/layout/main.gsp and replace all the code between the <body> tags with the following lines of code

<div id="page">

<div id="topbar">
<g:render template="/common/topbar" />
</div>

<div id='header'>
<h1 style="font-size:62px;text-align:center;"> Moongrails </h1>
</div>

<div id="content">
<g:layoutBody />
</div>

<div id='navbar'>
<g:render template="/common/navbar" />
</div>

<div id="footer">
<g:render template="/common/footer" />
</div>

</div>


The content in the central fragment will be populated by the gsp pages in the various view folders. When the user navigates to any particular page, e.g. /user/list.gsp, grails imports in the contents of that page and inserts it into the content div via the <g:layoutBody /> tag.

Step 7: modify main.css

The final step is to code up the styling for the various templates.

/* --------------------------------------*/
/* PAGE container */
/* --------------------------------------*/
/* Contains page contents e.g header,navbar, content, footer */
#page {
width: 90%;
margin: 0px auto;
padding: 4px 0;
text-align:left;
}


/* --------------------------------------*/
/* TOPBAR */
/* --------------------------------------*/
#topbar {
text-align:left;
padding:5px 0;
border-top: 1px solid #333;
background: #aaaaaa;
height: 15px;
}

#topbar #welcome{
float:left;
text-align:left;
font-size: 12px;
padding: 0px 0px 0px 10px;
color: #ffffff;
}

#topbar #menu{
float: right;
text-align: right;
font-size: 12px;
color: #ffffff;
}

#topbar #menu a{
color: #ffffff;
padding: 0px 10px 0px 0px;
}

/* --------------------------------------*/
/* HEADER */
/* --------------------------------------*/
#header {
background: #227ce8;
height: 150px;
margin: 0px auto;
border-top: solid 2px #000000;
}

#header h1 {
font-family:Arial,sans-serif;
color: white;
padding: 20px 0 0 6px;
font-size:1.6em;
}

/* --------------------------------------*/
/* CONTENT */
/* --------------------------------------*/
#content {
float: left;
width: 80%;
color: #000;
margin: 0 0.5em 0 0;
padding: 0px 10px 5px 0px;
}

/* --------------------------------------*/
/* NAVBAR */
/* --------------------------------------*/
#navbar {
float: right;
width: 210px;
color: #ff0000;
padding: 0px 5px 0px 5px;
margin: 0 0 0 0;
border-left: 1px solid #d3d3d3;
border-right: 1px solid #d3d3d3;
}


/*2.12.08 IE correction to drop sidbarBox*/
html>body #navbar .navbarBox {

width: 200px;
color: #0000ff;
background: #2175bc;
margin: 0px 5px 5px 5px ; /*ensure there's a gap between text in navbar and start of navbar*/
}

/*Header for boxes in navbar menu*/
#navbar .navbarBox h1{
background: #227ce8;
color: #ffffff;
font-weight: normal;
font-size: 16px;
}

/* --------------------------------------*/
/* FOOTER */
/* --------------------------------------*/
#footer {
border: solid 1px #000000;
height: 20px;
clear:both;
padding:5px;
margin: 5px 5px 5px 5px;
background: #ababab url(../images/footer.png) repeat;
}

#footer .tandc{
float: right;
color: #0000ff;
}

#footer .copyright{
float: left;
color: #0000ff;
}

/*----------------------------------------------------------*/
/* Improved vertical menu for navbar: see http://css.maxdesign.com.au/listamatic/vertical10.htm
/*----------------------------------------------------------*/

h1.panelHeader{
font-weight: bold;
text-align: center;
}

/*need html>body hack otw menu boxes, e.g. navbarbx all merge together*/
html>body .navcontainer1
{
width: 100%;
border-right: 1px solid #000;
font-family: Verdana, Lucida, Geneva, Helvetica, Arial, sans-serif;
background-color: #227ee8;
color: #333;
}

.navcontainer1 ul
{
list-style: none;
margin: 0;
padding: 0;
border-top: 2px solid #000000;
}

.navcontainer1 li
{
border-bottom: 1px solid #90bade;
margin: 0;
}

.navcontainer1 li a
{
display: block;
padding: 5px 5px 5px 0.5em;
border-left: 10px solid #1958b7;
border-right: 10px solid #508fc4;
background-color: #2175bc;
color: #ffffff;
text-decoration: none;
}

html>body .navcontainer1 li a { width: auto; }

.navcontainer1 li a:hover
{
border-left: 10px solid #1c64d1;
border-right: 10px solid #5ba3e0;
background-color: #2586d7;
color: #fff;
}


The menu in the navbar was styled using resources from Listomatic's Menu Tutorial. This is an excellent site which provides hints on how to create and style vertical/horizontal css menus.

The final result is displayed below.


The application suffers from at least a couple of problems when viewed using IE6. One of these shows the menu items in the navbar displayed in gray even though the css marks them to be white. To resolve this simply remove 'a:visited' from the line

a:link, a:visited, a:hover {


in the file main.css.

This example was developed using grails 1.03 and can be downloaded [templates.zip] from here.